실습
- MetalLB 설치 및 부하 분산 확인
- MetalLB HA 및 부하 테스트
Why MetalLB
예산 및 부하 등을 고려하여 특정 서비스는 외부 서비스 오픈 시 LoadBalancing을 위한 물리 L4 스위치를 사용하지 못할 수 있습니다. 또한 NGINX 등의 Web 서버는 고객 대상 80, 443 well-known port를 사용해야 하므로 NodePort type Service를 사용하지 못하는 경우가 많습니다.
이경우 open source로 사용 가능한 LoadBalancer, MetalLB를 사용 가능합니다.

MetalLB 설치
설치는 다른 Kube Application과 마찬가지로 아주 간단합니다.
설치 관련 공식 홈페이지
https://metallb.universe.tf/installation/
MetalLB, bare metal load-balancer for Kubernetes
Installation Before starting with installation, make sure you meet all the requirements. In particular, you should pay attention to network addon compatibility. If you’re trying to run MetalLB on a cloud platform, you should also look at the cloud compat
metallb.universe.tf
[spkr@erdia22 ~ (kspray:postgresql)]$ kubectl edit configmap -n kube-system kube-proxy
Edit cancelled, no changes made.
(kubespray로 설치 시 metallb 옵션을 추가 하면 추가 ConfigMap 설정 변경이 필요 없습니다.)
[spkr@erdia22 ~ (kspray:postgresql)]$ kubectl apply -f https://raw.githubusercontent.com/metallb/metallb/v0.9.6/manifests/namespace.yaml
ctl apply -f https://raw.githubusercontent.com/metallb/metallb/v0.9.6/manifests/metallb.yaml
# On first install only
kubectl create secret generic -n metallb-system memberlist --from-literal=secretkey="$(openssl rand -base64 128)"
namespace/metallb-system created
[spkr@erdia22 ~ (kspray:postgresql)]$ kubectl apply -f https://raw.githubusercontent.com/metallb/metallb/v0.9.6/manifests/metallb.yaml
Warning: policy/v1beta1 PodSecurityPolicy is deprecated in v1.21+, unavailable in v1.25+
podsecuritypolicy.policy/controller created
podsecuritypolicy.policy/speaker created
serviceaccount/controller created
serviceaccount/speaker created
clusterrole.rbac.authorization.k8s.io/metallb-system:controller created
clusterrole.rbac.authorization.k8s.io/metallb-system:speaker created
role.rbac.authorization.k8s.io/config-watcher created
role.rbac.authorization.k8s.io/pod-lister created
clusterrolebinding.rbac.authorization.k8s.io/metallb-system:controller created
clusterrolebinding.rbac.authorization.k8s.io/metallb-system:speaker created
rolebinding.rbac.authorization.k8s.io/config-watcher created
rolebinding.rbac.authorization.k8s.io/pod-lister created
daemonset.apps/speaker created
deployment.apps/controller created
[spkr@erdia22 ~ (kspray:postgresql)]$ # On first install only
[spkr@erdia22 ~ (kspray:postgresql)]$ kubectl create secret generic -n metallb-system memberlist --from-literal=secretkey="$(openssl rand -base64 128)"
secret/memberlist created
설치가 정상 완료 되었습니다.
[spkr@erdia22 ~ (kspray:postgresql)]$ kns metallb-system
Context "kspray" modified.
Active namespace is "metallb-system".

[spkr@erdia22 ~ (kspray:metallb-system)]$ kgp
NAME                          READY   STATUS    RESTARTS   AGE   IP              NODE   NOMINATED NODE   READINESS GATES
controller-64f86798cc-dgtts   1/1     Running   0          50s   10.233.127.2    ksp1   <none>           <none>
speaker-bwd8t                 1/1     Running   0          50s   172.17.28.173   ksp3   <none>           <none>
speaker-f5wpz                 1/1     Running   0          50s   172.17.28.171   ksp1   <none>           <none>
speaker-sfql8                 1/1     Running   0          50s   172.17.28.172   ksp2   <none>           <none>
이제 Loadbalancer 에서 사용할 IP 대역을 지정합니다. IP 대역 할당은 ConfigMap으로 관리합니다.
apiVersion: v1
kind: ConfigMap
metadata:
  namespace: metallb-system
  name: config
data:
  config: |
    address-pools:
    - name: default
      protocol: layer2
      addresses:
      - 172.17.30.171 ~ 172.17.30.179
# - 172.17.16.174 - 172.17.16.174 단일 IP 지정 방법

[spkr@erdia22 56.MetalLB (kspray:metallb-system)]$ ka metallb-config.yml
configmap/config created
[spkr@erdia22 56.MetalLB (kspray:metallb-system)]$ k get cm
NAME               DATA   AGE
config             1      3s
kube-root-ca.crt   1      4m11s
그럼, POD를 실행하고 Service Type을 LoadBalancer를 지정합니다. 저는 BGP Mode가 아닌 편의상 Layer 2 Mode를 사용 하였습니다.
apiVersion: apps/v1
kind: Deployment
metadata:
  name: nginx-hello
  namespace: nginx
  labels:
    app: nginx
spec:
  replicas: 4
  selector:
    matchLabels:
      app: nginx
  template:
    metadata:
      labels:
        app: nginx # Service 등에서 참조할 Label 이름
    spec:
      containers:
      - name: nginx
        image: nginxdemos/hello

apiVersion: v1
kind: Service
metadata:
  name: nginx-svc
  namespace: nginx
spec:
  ports:
  - name: http
    port: 80
    protocol: TCP
    targetPort: 80
  selector:
    app: nginx
  type: LoadBalancer  # type만 LoadBalancer로 변경하시면 됩니다.
  loadBalancerIP: 172.17.30.178  # 특정 IP 지정이 가능합니다.
적용 후 Service 내역을 확인합니다.
[spkr@erdia22 56.MetalLB (kspray:nginx)]$ k get svc
NAME        TYPE           CLUSTER-IP     EXTERNAL-IP     PORT(S)        AGE
nginx-svc   LoadBalancer   10.233.4.235   172.17.30.178   80:32337/TCP   76s
부하 분산 검증
Service YAML 파일에 지정한대로 Service - EXTERNAL-IP가 172.17.30.178으로 생성되었습니다. 이제, 웹브라우저에서 172.17.30.178 접속하면 정상적으로 페이지 확인이 가능합니다.

Load Balancing 확인을 위하여 화면 중간 Auto Refresh 버튼을 체크 합니다.

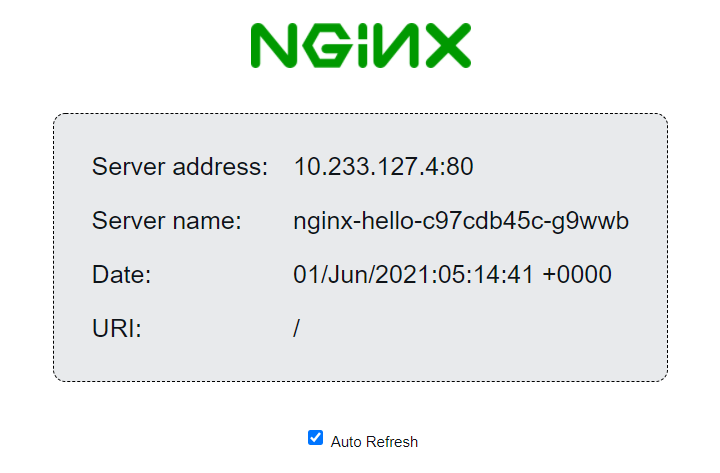
위와 같이 Server name이 변경되는걸(nginx-hello-c97cdb45c-pfbvg, nginx-hello-c97cdb45c-g9wwb) 확인 가능합니다. server name은 POD 이름과 동일합니다. 각 POD 별로 부하가 분산되고 있습니다.
[spkr@erdia22 ~ (kspray:nginx)]$ kgp
NAME                          READY   STATUS    RESTARTS   AGE   IP             NODE   NOMINATED NODE   READINESS GATES
nginx-hello-c97cdb45c-5rz6w   1/1     Running   0          14m   10.233.127.3   ksp1   <none>           <none>
nginx-hello-c97cdb45c-g9wwb   1/1     Running   0          14m   10.233.127.4   ksp1   <none>           <none>
nginx-hello-c97cdb45c-pfbvg   1/1     Running   0          14m   10.233.79.2    ksp2   <none>           <none>
nginx-hello-c97cdb45c-rkf8p   1/1     Running   0          14m   10.233.87.2    ksp3   <none>           <none>
다음으로 로그를 통하여 어떤 MetalLB POD가 응답하는지 확인해 보겠습니다.
[spkr@erdia22 ~ (kspray:metallb-system)]$ kubetail -n metallb-system |grep 172.17.30.178
[controller-64f86798cc-dgtts] {"caller":"service.go:114","event":"ipAllocated","ip":"172.17.30.178","msg":"IP address assigned by controller","service":"nginx/nginx-svc","ts":"2021-06-01T05:19:38.468038259Z"}
[speaker-bwd8t] {"caller":"main.go:275","event":"serviceAnnounced","ip":"172.17.30.178","msg":"service has IP, announcing","pool":"default","protocol":"layer2","service":"nginx/nginx-svc","ts":"2021-06-01T05:19:38.527708961Z"}

(kubetail 을 사용하면 복수의 POD 로그 확인이 가능하여 편리합니다.)
로그에서 확인할 수 있듯이 “172.17.30.178” IP 요청에 대하여 controller가 speaker-bwd8t POD를 지정하였고 해당 POD가 MAC response를 보내고 있습니다. speaker-bwd8t는 아래와 같이 ksp3 노드에 할당되었습니다.
[spkr@erdia22 ~ (kspray:metallb-system)]$ kgp
NAME READY STATUS RESTARTS AGE IP NODE NOMINATED NODE READINESS GATES
controller-64f86798cc-dgtts 1/1 Running 0 27m 10.233.127.2 ksp1 <none> <none>
speaker-bwd8t 1/1 Running 0 27m 172.17.28.173 ksp3 <none> <none>
speaker-f5wpz 1/1 Running 0 27m 172.17.28.171 ksp1 <none> <none>
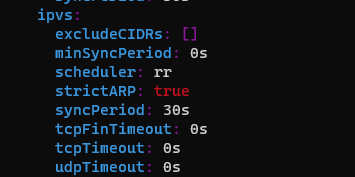
speaker-sfql8 1/1 Running 0 27m 172.17.28.172 ksp2 <none> <none>ksp3 노드에서 확인하면 “172.17.30.178” IP가 IPVS network interface에 할당되었습니다. (네트워크를 잘 모르는 저 입장에서 신기합니다 ^^)
[spkr@ksp3 ~]$ ip a show |grep 172.17.30.178 -B 20 -A 5
(생략)
5: kube-ipvs0: <BROADCAST,NOARP> mtu 1500 qdisc noop state DOWN group default
    link/ether 56:cc:9a:6b:fb:ef brd ff:ff:ff:ff:ff:ff
(생략)
    inet 10.233.38.98/32 scope global kube-ipvs0
       valid_lft forever preferred_lft forever
    inet 172.17.30.178/32 scope global kube-ipvs0
       valid_lft forever preferred_lft forever
(생략)
즉, 해당 IP “172.17.30.178”에 대한 ARP MAC 응답을 노드 Interface에 할당하여 처리하고 있습니다.
Load Balancing 기능은 MetalLB에서 처리하는 게 아니고 Kube service인 kube-proxy 에서 처리 합니다. 관련 내용을 MetalLB 공식 문서에서 확인하면 아래와 같습니다.
Load-Balancing Behavior
In layer 2 mode, all traffic for a service IP goes to one node. From there, kube-proxy spreads the traffic to all the service’s pods.
In that sense, layer 2 does not implement a load-balancer. Rather, it implements a failover mechanism so that a different node can take over should the current leader node fail for some reason.
If the leader node fails for some reason, failover is automatic: the failed node is detected using memberlist, at which point new nodes take over ownership of the IP addresses from the failed node.from : https://metallb.universe.tf/concepts/layer2/
(RoundRobin, Least Connection 등의 LB 옵션은 kube-proxy IPVS proxy mode 설정에 따릅니다.)
그럼, 부하 분산이 잘 되는지 확인해 보겠습니다. 사실 kube-proxy가 부하 분산을 담당하므로 당연히 잘되어야 합니다. ^^ JMeter로 부하 테스트를 하였습니다.
100개 Session을 보냈는데 아래와 같이 5개 POD에 비교적 균등하게 나누어 집니다.

3개 POD로 줄였는데 역시 잘 분산됩니다.

HA Test
공식 문서 Layer 2 옵션은 노드 다운 시 서비스 다운 타음은 아래와 같이 10s 이내 down time 이라고 합니다.
If you encounter a situation where layer 2 mode failover is slow (more than about 10s), please file a bug! We can help you investigate and determine if the issue is with the client, or a bug in MetalLB.
ARP 처리를 하는 노드를 reboot 합니다.
[spkr@erdia22 ~ (spkn02:metallb-system)]$ ~/hosts/ctr3
Last login: Tue Apr 20 05:29:28 2021 from 172.17.18.2
[spkr@node3 ~]$ sudo reboot
Connection to ctr3 closed by remote host.
Connection to ctr3 closed.
curl을 이용하여 서비스 이상 여부를 확인합니다.
[spkr@erdia22 erdia (spkn02:metallb-system)]$ while true;do curl -I 172.17.28.160; sleep 1; done

HTTP/1.1 200 OK
Server: nginx/1.13.8
Date: Mon, 19 Apr 2021 23:06:12 GMT
Content-Type: text/html
Connection: keep-alive
Expires: Mon, 19 Apr 2021 23:06:11 GMT
Cache-Control: no-cache

^C
[spkr@erdia22 erdia (spkn02:metallb-system)]$ while true;do curl -I 172.17.28.160; sleep 1; done
HTTP/1.1 200 OK
Server: nginx/1.13.8
Date: Mon, 19 Apr 2021 23:06:19 GMT
Content-Type: text/html
Connection: keep-alive
Expires: Mon, 19 Apr 2021 23:06:18 GMT
Cache-Control: no-cache
위와 같이 약 7초(23:06:12 ~ 23:06:19) 동안 loss 가 있었습니다. 7초면 운영 환경에서도 사용 가능할 정도로 양호하다 생각됩니다. ^^
MetalLB POD 로그로 확인해 보겠습니다.
[spkr@erdia22 ~ (spkn02:metallb-system)]$ kubetail -n metallb-system |grep 172.17.28.160

[speaker-qzjtx] {"caller":"arp.go:102","interface":"eth0","ip":"172.17.28.160","msg":"got ARP request for service IP, sending response","responseMAC":"50:6b:8d:93:63:38","senderIP":"172.17.19.4","senderMAC":"d0:c6:37:a4:55:56","ts":"2021-04-19T23:05:46.107914649Z"}


[speaker-jqlvl] {"caller":"main.go:275","event":"serviceAnnounced","ip":"172.17.28.160","msg":"service has IP, announcing","pool":"default","protocol":"layer2","service":"nginx/nginx-svc","ts":"2021-04-19T23:06:18.435753762Z"}
위와 같이 노드 reboot 이 후 ARP 응답을 하는 POD가 변경 되었습니다.(speaker-qzjtx -> speaker-jqlvl)
부하테스트
공식 문서에서 확인하면 단일 노드에서 처리하여 노드 Throughput이 bottle neck이라고 합니다. (BGP Mode를 사용하면 여러 노드에서 처리가 가능하여 성능이 증가될 것으로 보이나 스위치 설정이 필요한 듯하여 패스 하였습니다.)
As explained above, in layer2 mode a single leader-elected node receives all traffic for a service IP. This means that your service’s ingress bandwidth is limited to the bandwidth of a single node. This is a fundamental limitation of using ARP and NDP to steer traffic.
JMeter로 초당 1000 Session 부하 실행 시 정상적으로 처리 가능 하였습니다. 인증, DB 접속도 필요하지 않는 기본 페이지로 테스트한 결과라 실제 부하 테스트 환경과는 차이가 있어 참조 용도로만 사용 가능합니다.


Vegeta 부하 툴로 측정 시에도 동일하게 에러가 발생하지는 않았습니다. 99% latency도 30ms로 양호한 수준으로 판단 됩니다.
[spkr@erdia22 56.MetalLB (spkn02:metallb-system)]$ echo "GET http://172.17.28.160/" | vegeta attack -name=1000qps -rate=1000 -duration=30s | tee results.1000qps.bin |vegeta report
Requests      [total, rate, throughput]         30000, 1000.04, 999.71
Duration      [total, attack, wait]             30.009s, 29.999s, 9.915ms
Latencies     [min, mean, 50, 90, 95, 99, max]  2.346ms, 9.796ms, 8.435ms, 14.705ms, 19.175ms, 30.999ms, 127.419ms
Bytes In      [total, mean]                     217050000, 7235.00
Bytes Out     [total, mean]                     0, 0.00
Success       [ratio]                           100.00%
Status Codes  [code:count]                      200:30000
Error Set:
이상 Kubernetes LoadBalancer로 사용 가능한 MetalLB에 대하여 알아 보았습니다.
기존 L4 스위치에 비하여 아쉬운 점은 세션 현황 등을 확인할 수 있는 admin GUI page 가 없는 것 입니다. 하지만 오픈 소스이고 편의성, 가용성을 고려한다면 충분히 운영 환경에서 사용 가능할 것으로 판단됩니다. 현재 실 운영 환경에서 잘 사용하고 있습니다. (물리 L4 스위치도 필요없는 좋은 세상에 살고 있습니다 ㅎㅎ)
'쿠버네티스 교육' 카테고리의 다른 글
| 11. Kube 교육 - OpenEBS LocalPV (0) | 2021.06.04 |
|---|---|
| 10. Kube 교육 - Kube Storage(PV PVC SC) (0) | 2021.06.04 |
| 08. Kube 교육 - NodePort, LoadBalancer (5) | 2021.06.04 |
| 07. Kube 교육 - Service Discovery (0) | 2021.06.04 |
| 14. Kube 교육 - Readiness/Liveness Probe (0) | 2021.06.04 |